Construction is going well, with clear weather and an efficient team making for speedy progress!
In our last update, we saw the first month of work on site, and how well things were progressing. [Remember you can find an overall summary of the top tips on our journey so far on the Hit List here.]
In this update, we look at how construction is progressing, and with Clare and Darren visiting the site almost daily, we have great piccies to show how things are developing.
And they’re developing quickly!! Honestly, this is the nature of building with a volume builder – whether they’re building a project home, or a custom-designed one. A volume builder is geared for speed, using efficiency with systems, trades and processes to make sure one job runs seamlessly into the next. They have programming down to a fine art, because usually they’re running teams across other projects, and so a hold up on one site can mean a hold up on another.
Progress on site
Generally, the early flurry of activity in a home build is all geared at getting the roof on. It’s the first step in waterproofing the house.
Once the roof is on the home, work focuses on wrapping the building and getting it waterproof so that internal work can begin to occur. This includes running electrical and plumbing services, and in this case, airconditioning and a ducted vacuum system.
For a home to be waterproof, it doesn’t necessarily need to have all its cladding on externally – just the insulative wrapping that goes on before, and any windows and doors installed.
Once its waterproof, and wiring and piping for services are in place, plasterboard lining can start being installed internally. Brickwork will start going up externally.
In two storey homes, work is also generally geared at getting the scaffolding up and down as quickly as possible. Scaffolding costs on homes are stupidly expensive. I remember during my time at Mirvac, we calculated that the scaffolding costs per home were more expensive than the design fees. So the cost to actually design the home – the permanent work of imagining it and drawing it up, was less than the cost of the temporary structure that got put around it during construction. Does that sound crazy to you? It certainly does to me.
A couple of hiccups
Clare and Darren have found there’s been a couple of items they’ve really had to be ‘on’ as work occurs at a rapid pace. Clare notes:
“It’s imperative that you meet the trades on site because they don’t read the plans very well. The electrician had missed that there was an insinkerator that needs power, and an on/off switch.
Locations where we had plugs weren’t working (as spaces were tight) so some alternative locations needed to be found.
He hadn’t picked up that there was heated towel rails in both bathrooms, and the positioning of pendant lights and fans, particularly in the open plan space, needed our guidance.”
This is similar feedback that Jodie gave in her sum-up experience of building her own home – the importance of attending site with your drawings, and checking the work. Of course, you need the builder’s permission to be on site. There was also an issue when the windows were delivered. They differed in size to the framed openings. So amendments needed to be made to the framed openings to accommodate the glazing. Given that alignment is a big thing in glazing design – so window sills aligning with other elements, or window and door heads aligning with each other, and other things in the home – this is where an eagle eye needs to be kept. Sometimes it’s tricky to see this misalignment at frame stage, but it will be SO obvious once everything is lined and clad (which is when it’s a lot more work and cost to fix!) And it will be the stuff that drives you mental living with it every day. So being aware, watchful and proactive now will save you headaches down the road.
TOP TIP: Attend site regularly with your drawings. Check progress against your drawings. If you note an error, speak to the builder or site supervisor. Make sure if you speak directly to a tradesperson, that the builder/site supervisor is also aware of the issue.
Clare and Darren have taken heaps of photos during this stage. It’s always a great idea to take lots of photos when your home is under construction, for a couple of reasons.
One is to track progress … because sometimes it will feel like there isn’t much. If you have a great photographic diary though, you will see that things are moving along and progress is happening. It’s a great sanity giver.
Another is to keep a record of the build – so say you hit a warranty issue down the track, or a defect turns up after construction has finished – having these photographic records can help you get things resolved quickly if you need evidence at that point.
Thirdly is a pragmatic one – photographing all your wiring and plumbing before the home is internally lined will help you down the track anytime you want to add an extra powerpoint, or make changes that require some knowledge of your services – without you having to hack the walls apart to find them.
TOP TIP: Photograph progress on site so you have a record for future use – for evidence if things go wrong, to know where your services are if you need to do work on them, and to keep a diary of your build you’ll enjoy viewing later.
Undercover Architect jumps in
Because we did so much work together up front, and the nature of working with a volume builder, the building process hasn’t needed much assistance from me. Clare and Darren are both the type of homeowners who like being prepared, and so have done a lot of upfront work to make the construction process easier. They also enjoy being closely involved in the decision-making on site, and just call on advice when they want extra ideas or suggestions. The rear covered area was an example of this.
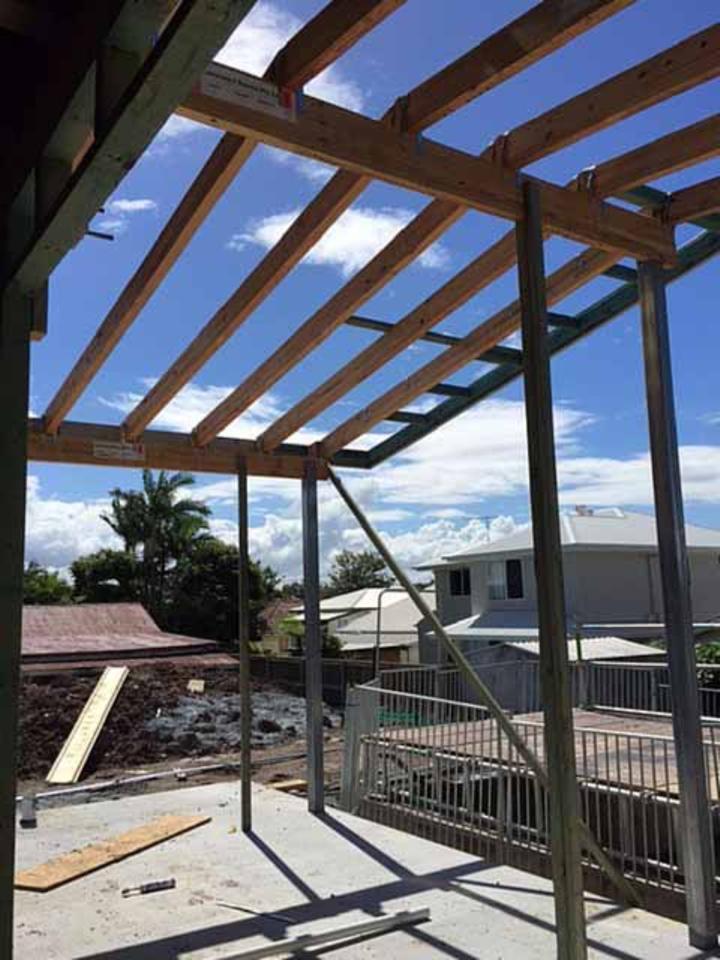
Clare and Darren emailed me with a photograph of the framing on their rear covered area. In my original design, this area was intended to have two roofing types on it. One half (where the outdoor seating area was) was to be a solid roof with a soffit and lighting. The other half (which sits in front of the kitchen) was to be weatherproof but still allow light to penetrate – so using a polycarbonate or similar material to enable natural light into the kitchen.
Whilst this was mentioned on the drawings and in the specification schedule, it had been missed as part of construction.
During one of their site visits, Clare and Darren noticed that the rear roof had been framed up similarly on both sides, and the tradies were intending on roofing the whole thing with metal roofing, and putting a soffit right through.
They sent me (via email) this image, and asked for suggestions about how we could work with the existing structure to still achieve a translucent roof as intended.

The challenge we have here is that this roof has been framed a certain way. The framing is intended to be hidden. So the fixings aren’t that nice, the timber isn’t that special, the connections aren’t that tidy. All perfectly fine and functional if it’s being lined and roofed, but not for what was initially intended.
So how do you create a workaround? These are my tips:
- Work out first whether you still need to have it the way it was intended. Sometimes once things are built, the original design can change and things not be poorly impacted as a result
- Understand what your rights are, and how much you’re willing to push it. Sometimes any changes will be cost prohibitive because of the contract rules, or your desire to get the project finished will outweigh your desire to stall it with a change. Sometimes the builder will offer money back instead, and if your home isn’t impacted, you may choose this option instead.
- If you still want to correct the error or , look at how you can use the existing elements and create an alternative solution that achieves the same function / aesthetic / impact.
The problem I had to solve here was: How do we put a translucent roof on something that isn’t meant to be exposed?
I got on the phone to Clare and Darren, and we fleshed out a few options – aiming to get a resolution that could fit into the sequencing of trades (because they didn’t want to hold up progress), and that wasn’t going to incur additional costs. Lots of ideas were thrown about over the phone, and each time, I thought about installation, maintenance and function.
How did we solve it?
When you paint out something all the same colour, it makes it difficult to see the imperfections in it. So that was the first step. Paint all the existing framing and fixings in one colour.
Then apply the translucent roofing to the top of the framing – remember, this roof is visible from the upper floor bedrooms, so it needs to look good from there too. The builder had been suggesting some skylights that wouldn’t achieve this result.
Then, on the underside of the framing, line it with timber battening, with spacing between them. This will also help to conceal the framing, and painting it all the same colour will make maintenance easy long term (for repainting). Light can then come through the translucent roofing, and the battening will create a great rhythmic quality to the light. The roofing area can still be hosed out for cleaning and everything is weatherproof.
All of this can fit into the current sequencing easily, and not delay work overall.[I’ll post some piccies of the finished product in a later update.]
Part 2 of our construction movie …
With a homeowner taking regular piccies, we have the benefit of seeing how this project is developing in all its detail. I just love it – I hope you do too. This video captures months 2 and 3 (well, about 7 weeks) of the next phase of progress on the Andersons’ Project …
Isn’t it exciting?
Whether you’ve done this before yourself or not, I suspect you can imagine just how exciting it is to see your home coming together like this. For Clare and Darren, who are currently living in a rental with a lot of their belongings in boxes, they can’t wait to be in their new home. Their kids are also very excited about their new rooms, and the anticipation of how they’ll make this home theirs is really enjoyable.
And when things are coming together so quickly … who can blame them?

 With over 30 years industry experience, Amelia Lee founded Undercover Architect in 2014 as an award-winning online resource to help and teach you how to get it right when designing, building or renovating your home. You are the key to unlocking what’s possible for your home. Undercover Architect is your secret ally
Leave a Reply